Posts

Showing posts from June, 2018

Could it be an Oil Cooler Leak?
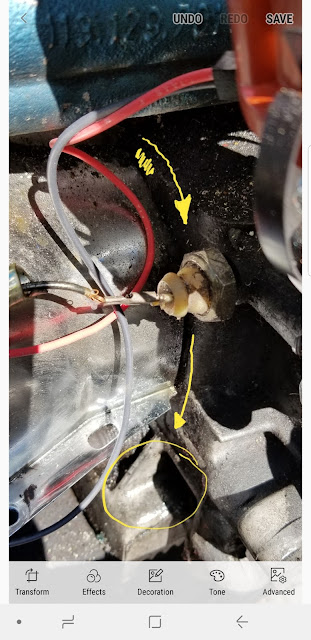
Image
So after a minor amount of research on my oil leak. Again, left top side of the engine oil leak, AND it is a bad leak I replaced the pulley, wiped down as much as I could around that area and then I started the engine let it run and I see a stream of oil run down the left side and start to pool in a small area near the pulley...picture below. A video would be better but, wow. The picture shows the left side of the engine, with the JUG TIN and the oil pressure sending unit (Yes I know I need to replace that sending unit wire) The oil flows (literally flows) from the top area marked in Yellow and pools at the bottom circled area. Anyway I do a quick google search on " oil leak on left top side of 1970 VW bug " and I find this video.  https://www.youtube.com/watch?v=ODMSaBE9Hx4 and I found this article on The Samba,  https://www.thesamba.com/vw/forum/viewtopic.php?t=487810  Both of which are helpful and give me the start of what I think I need to do.

Removing the Crankshaft pulley on a 1970 VW bug

Image
Removing the crankshaft or timing pulley from a 1970 VW bug, sounded daunting after reading and researching how it is done. I found this one video that helped. 1st was to remove the NUT which is a 30mm socket and a breaker bar I referenced this video. https://www.youtube.com/watch?v=P-FIjU5weLg My steps were to do exactly like this video said. Except I added some PB blaster for a day prior, then I removed the back tin, then I removed the center wire form my distributor, wedged the breaker bar against the body and tapped the key to start the engine. I know one of the comments said it is only 33ft, pounds tight and you could damage your engine, but on a 47 year old machine with some built up stickyness. I decided it would work after seeing every video say to do it this way and as long as I didn't start the car and only tapped the key it worked beyond my expectations. It was instantly loose and the bolt came right out. That was the easy part. Getting the Pulley off proved to be tr...

Now onto all the other work

Image
So since I have it running, nicely and it is a constant start and run, I am so excited to be able to move onto the other things. 1. Soak the old Carb (maybe I can reuse it soon). 2. everything else. There is so much to do that I don't know where to start. Here are the things going through my head Sanding down the exterior, sand down prep for painting (or at least so it isn't so ugly right now) Working on the interior floors, Take them to metal and coat/protect/paint Sand down the rims, for painting (might need to take them to a powder coater to clean and redo) Replace the Crankshaft pulley & Alternator Pulley, and Belt (Have a new one just need to swap out, but the pulley, as I have read is a bear to remove) Tear down the seats and cover them with new upholstery ( I think I just get seat covers for now and recover them later since I have a lot of work and I am sure being dirty and in and out will not mix with new interior. So here is what I have decided, 1. Sand a ...

Additional Post that I missed

Image
I realized that I missed a Post, the one where I finally figured out that the original Solex 30 Pict2 carb was not clean enough to allow a steady flow of gas to get to the engine and keep it running. After hours of cleaning and soaking I determined that there was hardly any gas getting through the fuel filter to the engine. It basically was starving the motor and hence when there is no gas OR not enough gas (indicated by me having to press the accelerator in order to keep it running.) This to me was a big thing since I had tried virtually everything I could to get the carb clean. SO I decided to cut my losses and buy a new one. Although I bought one that was not a 30Pict-2 It was compatible carb and it does the job. This allowed me to move on and begin working on other things AND to continue to soak the old carb and hopefully it will get clean enough to reuse OR I can tear it all the way down and maybe salvage it. ALAVENTE Carburetor Carb for VW Volkswagen Beetle Karmann Ghia 30/...

Finally, It Worked

So after a multitude of issues, the Pertronix worked. Here is something to note the primary video I used is this one.  SVDA Pertronix Distributor Install  since it was the exact distributor that I have. I used a Pertronix Flamethrower distributor, new cap and rotor, and a new Pertronix 40,000 volt coil. I also used new Spark plug wires and made sure that the positive and negative terminals were correct. I really only had one question prior to installing. 1. Do I just pop the old one out and install the new one? ANSWER: Yes, but make sure you are set to TDC when you pull the old one out. After watching the video is was pretty straight forward. BUT here are some things that they don't tell you . TIP ONE: at 2:22 in the video he just pops off the distributor cap and lets it hang. Assuming that he plans to use the same old cap. I want to use my new one so if you do please take it off then swap your wires to your new cap. SEE tip FIVE because this is where the video shows ...